Hello,
In this article, I will present how to organize Backups and restores on Proxmox based server with KVM/Qemu virtual machines installed. Every experienced sysadmin understands the need for quality and valid backups in case of disasters. So far, the only functional thing on the market is to extract data to a remote server. This can be done in various ways, but today I will present here how I did on one of my Proxmox based servers. The distance (remote) server is using C14 (https://www.online.net/en/storage/c14-cold-storage) which supports Rsync and FTP only connections.
For start, make sure that sshfs is installed and configured:
apt-get install sshfs
Create dir, for example,/c14backup/ and then mount new filesystem using sshfs fuse:
sshfs -p 48843 c14ssh@xxxxxxxxx.buffer.c14.io:/buffer/ /c14backup/
Explanation:
-p is ssh port used.
c14ssh is ssh username.
From @ is SSH hostname split by
:/buffer/ is the remote directory where data is going to be uploaded
And, /c14backup/ is a local folder here where we are going to mount new filesystem.
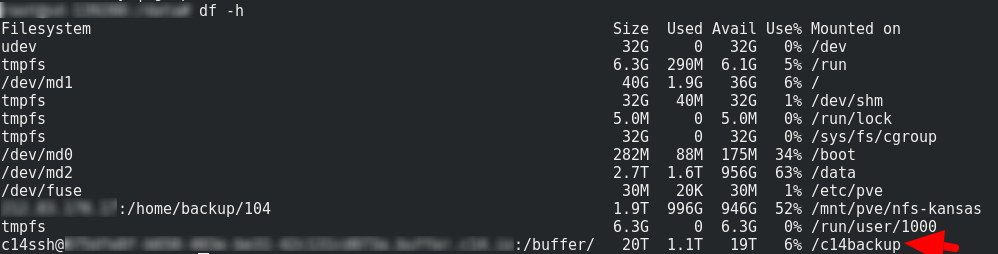
To check if everything is well mounted, please type:
df -h
In the output you should see SSH2FS FUSE filesystem, example:
Now, that this is finished, let's jump to the Proxmox panel and create new storage.
Click on DATACENTER --> Storage --> Add --> Directory
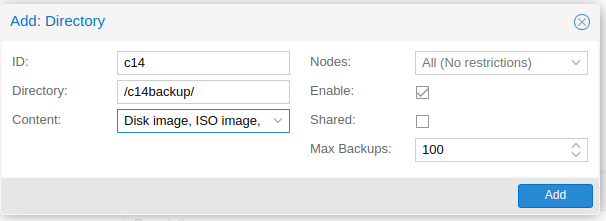
Explanation:
ID: (enter a preferred ID, can be anything really)
Directory: (Enter the freshly mounted SSH2FS FUSE filesystem located within /c14backup/ folder)
Content: Open that tab and select everything offered.
Max Backups: (Select preferred, by default, is 1 and values should be raised)
Next, you can safely open QEMU/KVM virtual instance, click on the BACKUP option, select storage as ID "c14" or whatever you wish and click on the BACKUP button further.
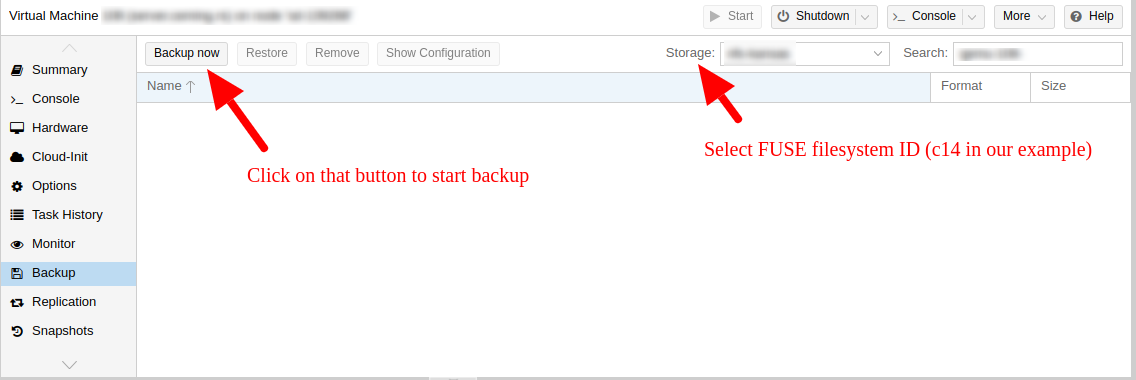
At this point, you can safely explore /c14backup/ folder and see that dumps are created within /c14backup/dump/ directory. Your data is safely stored within remote server while keeping QEMU/KVM virtual machine alive.
Of course, this can be automated from Terminal without need of GUI interface. Reference is https://pve.proxmox.com/wiki/BackupandRestore article with example:
Use snapshot mode (no downtime) and non-default dump directory.
vzdump 777 --dumpdir /mnt/backup --mode snapshot
You can adjust /mnt/backup to /c14backup/ safely where 777 is QEMU/KVM ID.
There are some tools with C14 OnlineSAS provider where you can create a bucket from the command line. Please check https://github.com/scaleway/c14-cli tool for further pieces of information.
Restore from LZO backup
Okay, now that we are having data on the remote server and they are safely residing there. I chose to do this via the command line, instead of the web interface.
First of, make sure that there’s enough space on the server where you are going to restore. It will need to hold the vma file as well as the extracted image.. You can do that safely on FUSE SSH2FS remotely mounted filesystem, but ideally, because of the speed of local hard drive, you will wish to do that on the real hard drive.
The command used is lzop:(https://www.lzop.org/lzop_man.php)
lzop -d vzdump-qemu-xxxxxx.vma.lzo
This will extract the vma file from the lzo archive. Change the file name to whatever your actual file name is. Note: Make sure you have again enough space. The differences between original lzo file and extracted can be greater.
Next, once file extracted we are going to use vma tool (https://pve.proxmox.com/wiki/VMA) to extract the image from it.
Example:
vma extract vzdump-qemu-xxxx.vma -v /data/nemanja
Note: Folder nemanja is going to be created automatically.
This will extract the VM image file as well as the configuration to the directory /data/nemanja. You can change this path to whatever is appropriate. The directory restore will be automatically created.
You can now mount this disk to the new QEMU/KVM virtual machine or mount a loopback device to extract data from it partially by using losetup tool.
Linux supports a special block device called the loop device, which maps a normal file onto a virtual block device. This allows for the file to be used as a “virtual file system” inside another file. With Linux, it’s possible to create a file-system inside a single file. These storage devices are available as device files such as /dev/device_name.
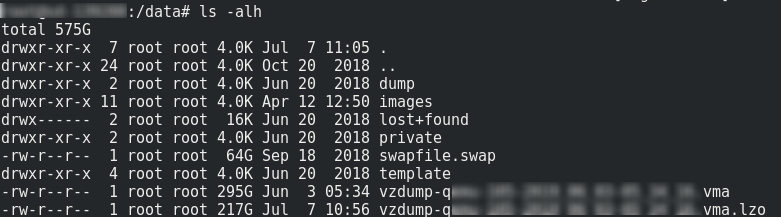
cd into the /data/nemanja folder. You will see disk-drive-scsi0.raw file or with the format original filesystem is using (COW2 for example).
Next step is to create a loop device with the file. Use the command “losetup” to create a loop device “loop0”
losetup -fP disk-drive-scsi0.raw
Explanation:
-f – find the first unused loop device. If a file argument is present, use this device. Otherwise, print its name.
-P – force kernel to scan the partition table on a newly created loop device.
To print the loop device generated using the above command use “losetup -a”. You can type losetup -l to list it as well.
Now let's mount it:
mkdir mount
mount -o loop /dev/loop0p3 /data/nemanja/mount/
Explanation:
-o loop is to mount a loopback device
- /dev/loop0
p1 (boot init)
p2 (is used for swap)
p3 (is usually root /home partition)

Extract files from it rsync or whatever. Before the disk image can be detached again from the loop device, the mounted filesystem needs to be unmounted. Depending on whether the disk image is from a single partition or an entire disk, the device to be unmounted needs to be given, like in the mount command.
umount /dev/loop0p3
With the filesystem unmounted, the disk image can be detached from the loop device.
$ sudo losetup -d /dev/loop0
With the “-d” option, losetup is instructed to detach the specified loop device.
Hope this article helps.