Hello,
More often we hear that website dropped on popular search engines because of slowness. These things happen when we serve uncached content to the Search engine Bots while visiting pages and we get penalized because of that. Recently, I have been testing one amazing service called prerender.io
Prerender is a node server that uses Headless Chrome to render HTML, screenshots, PDFs, and HAR files out of any web page. The Prerender server listens for an http request, takes the URL and loads it in Headless Chrome, waits for the page to finish loading by waiting for the network to be idle, and then returns your content.

Google recommends that you use Prerender.io in their docs (https://developers.google.com/search/docs/guides/dynamic-rendering), so your site is guaranteed to be crawled correctly by Google & other search engines.
It is fast, simple to use, and really straightforward. Vendor came with two solutions about how the application can be used:
1) By using prerender.io servers as middleware.
2) By installing your own server, and using it as a middleware in your's fleet.
Let's start with first. Visit https://prerender.io website and register. Once that is done, you will be logged to their Control panel area.
In https://prerender.io/documentation very detailed documentation pages vendor mention various ways to implement middleware between your application and this service, but since today we will make implementation for Magento 2 hosted on Nginx Web server, we will focus on that part.
https://prerender.io/documentation/install-middleware#nginx
Says that https://gist.github.com/thoop/8165802 having best way, but here is specific Nginx code that I've used to make this service integrated into present (functional) Nginx config file used for Magento 2 application
        set $prerender 0;
        if ($http_user_agent ~* "googlebot|bingbot|yandex|baiduspider|twitterbot|facebookexternalhit|rogerbot|linkedinbot|embedly|quora link preview|showyoubot|outbrain|pinterest\/0\.|pinterestbot|slackbot|vkShare|W3C_Validator|whatsapp") {
            set $prerender 1;
        }
        if ($args ~ "_escaped_fragment_") {
            set $prerender 1;
        }
        if ($http_user_agent ~ "Prerender") {
            set $prerender 0;
        }
        if ($uri ~* "\.(js|css|xml|less|png|jpg|jpeg|gif|pdf|doc|txt|ico|rss|zip|mp3|rar|exe|wmv|doc|avi|ppt|mpg|mpeg|tif|wav|mov|psd|ai|xls|mp4|m4a|swf|dat|dmg|iso|flv|m4v|torrent|ttf|woff|svg|eot)") {
            set $prerender 0;
        }

        #resolve using Google's DNS server to force DNS resolution and prevent caching of IPs
        resolver 8.8.8.8;

        if ($prerender = 1) {
        return 503;
        }

error_page 500 502 503 504 =200 @prerender;

location @prerender {
        proxy_set_header X-Prerender-Token <ENTER TOKEN HERE>;
            #setting prerender as a variable forces DNS resolution since nginx caches IPs and doesnt play well with load balancing
            set $prerender "service.prerender.io";
            rewrite .* /$scheme://$host$request_uri? break;
            proxy_pass http://$prerender;
        }
From this point when above Nginx conf is added, you are redirecting traffic for Google and all bots mentioned in the example to service.prerender.io service. You may simulate traffic by executing following command from any popular SSH terminal:
curl -IkL -A "Googlebot" https://magentocommand.ml
The output would be 200 OK:
> curl -IkL -A "Googlebot" https://magentocommand.ml
HTTP/2 200
content-type: text/html;charset=UTF-8
content-length: 178959
vary: Accept-Encoding
server: nginx
date: Sun, 14 Jun 2020 19:38:58 GMT
vary: Accept-Encoding
access-control-allow-origin: *
x-cache: Miss from cloudfront
via: 1.1 27aa7ec4f54edf4b2fd5fffda84693a0.cloudfront.net (CloudFront)
x-amz-cf-pop: SOF50-C1
x-amz-cf-id: fmPB6u2Cqhv06tGTBvgaFDFaW9aJ8eGjGnvlFT2tEGtqgrCHrjdSJw==
Visit https://prerender.io/ panel in your browser click on the Crawl stats at the top area (https://prerender.io/crawl-stats) and you will see simulated hit:

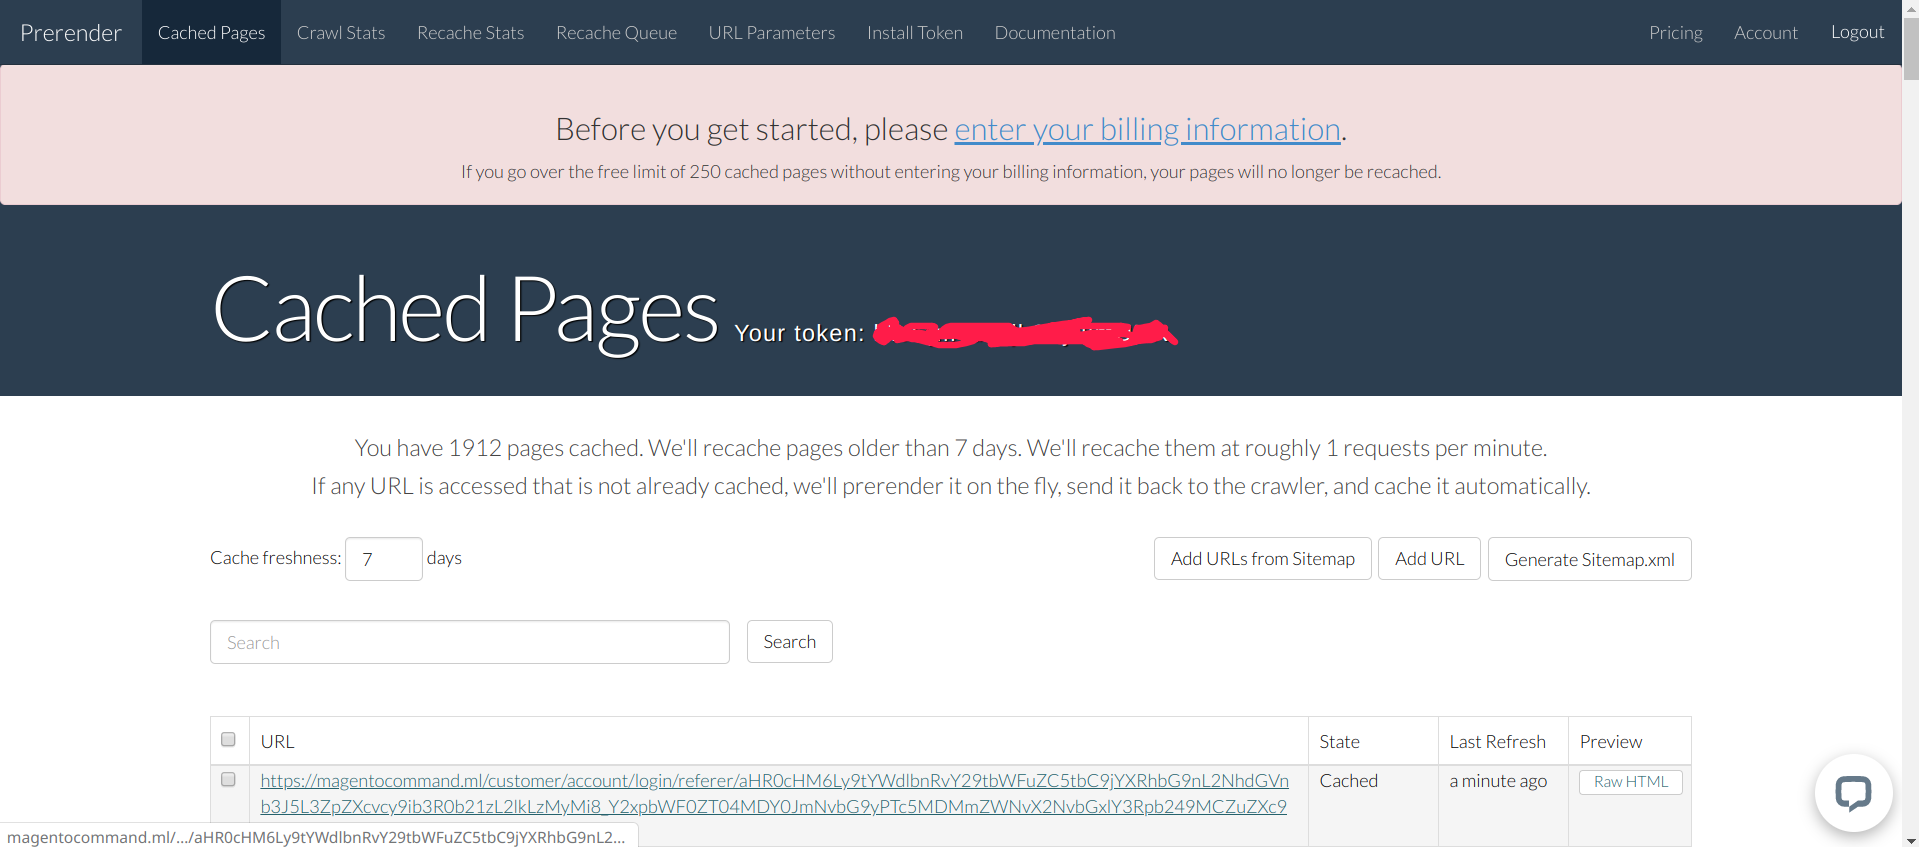
Within their panel, you may also view how RAW HTML page looks like by clicking on the Cached Pages option at the top menu.
To be honest, if you are having a small website with not many SEF pages, the vendor offers 250 cached pages completely free, then next tier is 20,000 cached pages for $15.00 USD per month.
There are several more small details about the implementation, but I did my best to make this as short as possible. We will jump now to 2nd method hosting your own prerender.io application.
I've installed a very small Cloud Server with German data center Hetzner AG because it is cheap, stable, and close to my location, but ideally, you can install this application on any platform.
1) As mentioned before, we will use Hetzner Cloud as our dedicated server. This guide was written using an instance with the Ubuntu image, but with a few little adjustments, it should also work with any popular Linux operating system.
Regarding the instance type, I suggest starting with something small, get some metrics, and then scale if needed, in the test I've rented CX21 type who comes with 2 VCPU, 4Gb of RAM and 40Gb of NVME disk space. It should be okay to start off with. Finally, configure the security group to allow SSH connections and custom TCP inbounds on port 3000 as that is where your prerender service will work (you can choose your own port here). I usually do the /etc/hosts.allow method allowing only certain IP to gain access. You can go with a popular Firewalls like firewalld or something inbound from Data Center (or Cloud) provider.
2) Setting up the environment:
Connect to the instance and install the needed tools. To get the node, I recommend using nvm and choosing the latest LTS version.
https://github.com/nvm-sh/nvm#git-install
apt-get update && apt-get install git
cd ~/ && git clone https://github.com/nvm-sh/nvm.git .nvm
cd ~/.nvm && git checkout v0.35.3
Now add these lines to your ~/.bashrc, ~/.profile, or ~/.zshrc file to have it automatically sourced upon login: (you may have to add to more than one of the above files)
export NVM_DIR="$HOME/.nvm"
[ -s "$NVM_DIR/nvm.sh" ] && \. "$NVM_DIR/nvm.sh"  # This loads nvm
[ -s "$NVM_DIR/bash_completion" ] && \. "$NVM_DIR/bash_completion"  # This loads nvm bash_completion
Sign off as SSH user, and log in again.
At the moment of writing this article latest Node/NVM was 12.18.0 (LTS: Erbium), so we will install this one:
nvm install 12.18.0
Output:

After nvm and node, we need to get forever, which will allow us to run the prerender server continuously in the background.
https://github.com/foreversd/forever
npm install forever -g
Output:

Next, we need to fetch the prerender source. To do this, clone the GitHub repo and run an npm install to get its dependencies.
git clone https://github.com/prerender/prerender.git
Next, we need to install Google Chrome.
wget https://dl.google.com/linux/direct/google-chrome-stable_current_amd64.deb
Installing packages on Ubuntu requires Sudo privileges. Make sure you are running the following command as a user with Sudo privileges.
Install the Google Chrome .deb package by typing:
apt install ./google-chrome-stable_current_amd64.deb
Time to add first flag and modify /root/prerender/server.js file with the following code:
var server = prerender({
  chromeFlags: ['--no-sandbox', '--headless', '--disable-gpu', '--remote-debugging-port=9222', '--hide-scrollbars']
});
The default one defaults to:
var server = prerender({});
A lot of other useful customizations can be added in this block based on https://github.com/prerender/prerender instructions.
To test if all is fine, run following from /root/prerender/ directory:
node server.js
Output:

To make it running uninterrupted, we can use forever tool that we have previously installed and run this as follows:
forever start /root/prerender/server.js
Output:
root@prerender-01:~/prerender# forever start /root/prerender/server.js
warn: --minUptime not set. Defaulting to: 1000ms
warn: --spinSleepTime not set. Your script will exit if it does not stay up for at least 1000ms
info: Forever processing file: /root/prerender/server.js
You may check if the port is listening by executing lsof tool:
lsof -i :3000
Output:
root@prerender-01:~/prerender# lsof -i :3000
COMMAND PID USER FD TYPE DEVICE SIZE/OFF NODE NAME
node 9198 root 18u IPv6 38348 0t0 TCP *:3000 (LISTEN)
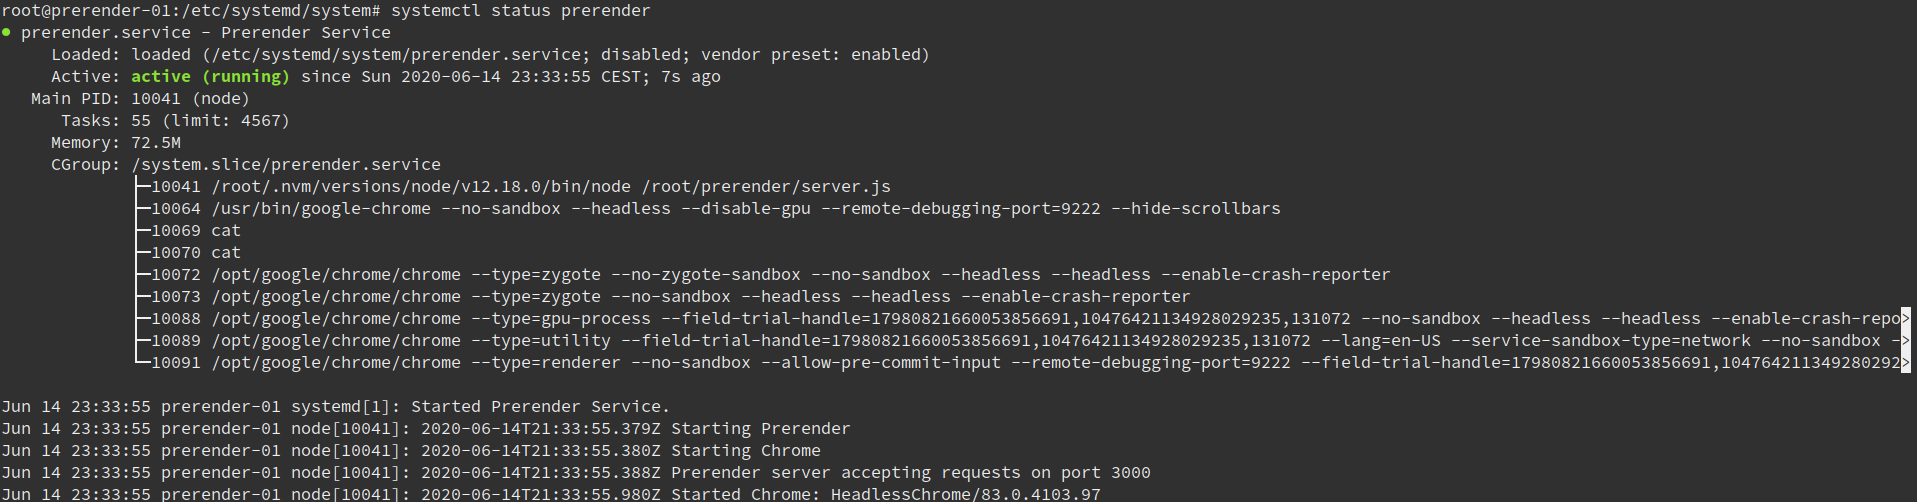
Now, that we are having Prerender server listening on port 3000, we can safely create systemd service so it can boot safely again in case of difficulties.
Navigate to /etc/systemd/system folder and create prerender.service file with the following content:
[Unit]
Description=Prerender Service

[Service]
User=root
WorkingDirectory=/root/prerender
ExecStart=/root/.nvm/versions/node/v12.18.0/bin/node /root/prerender/server.js

[Install]
WantedBy=multi-user.target
Then execute:
systemctl enable prerender
systemctl start prerender
Check status now with systemctl status pretender. The output should be like this one:
That's all! Now you can create a DNS zone in your's external entity and start using Prerender service on your Web server by implementing the Middleware method from the start of this article.
To just test out of the box if Prerender service is working you may execute the following:
curl http://localhost:3000/render?url=https://magentocommand.ml
One of the Alternative to track pages better is to install Nginx on the Prerender server and then using location / simply proxypass traffic to port 3000 while keeping that port enabled only to the localhost. That way, you may filter who is able and who is not to access Prerender service by using ports 80 or even more advanced with 443 (SSL).
The next one would be to configure Prerender on port 80 (why not!) and use it. To do that add one line to the /etc/systemd/system/prerender.service file under [Service] tab:
Environment=NODE_ENV=production PORT=80
Optionally, you may add some Cache settings and Number of workers. To be honest, I am testing this on 2 CPU Virtual Private server so I had to limit number of workers to single to prevent OOM failures. To make caching even possible you need to install https://github.com/prerender/prerender-memory-cache plugin.
Environment=NODE_ENV=production CACHE_MAXSIZE=100000
Environment=NODE_ENV=production CACHE_TTL=432000
Environment=NODE_ENV=production PRERENDER_NUM_WORKERS=1
The complete file should look like this:
[Unit]
Description=Prerender Service

[Service]
User=root
WorkingDirectory=/root/prerender
Environment=NODE_ENV=production PORT=80
Environment=NODE_ENV=production CACHE_MAXSIZE=100000
Environment=NODE_ENV=production CACHE_TTL=432000
Environment=NODE_ENV=production PRERENDER_NUM_WORKERS=1
ExecStart=/root/.nvm/versions/node/v12.18.0/bin/node /root/prerender/server.js

[Install]
WantedBy=multi-user.target
Extra addon. Generating HTML snapshots is a resource-intensive process, so some sort of caching strategy should be used to improve the performance. Prerender.io comes with several different caching plugins, but we will use the one based on Redis, as it offers scalability and a simple cache expiration mechanism. Redis can be built from source, but the pre-built version is sufficient for the task at hand.
sudo apt-get update
sudo apt-get upgrade
sudo apt-get -y install redis-server
Open /etc/redis/redis.conf file and make configuration is configured properly. For security measures I just uncomment bind line to bind to only 127.0.0.1 IP address or let's say localhost. Rest details can be adjusted per requirements/needs.
Download the Redis cache plugin and install it. Currently, it caches the pages for one day and then expires them. This can be overridden by specifying the env variable process.env.PAGETTL in seconds. To never expire, you should set the PAGETTL variable to 0.
npm install prerender-redis-cache --save
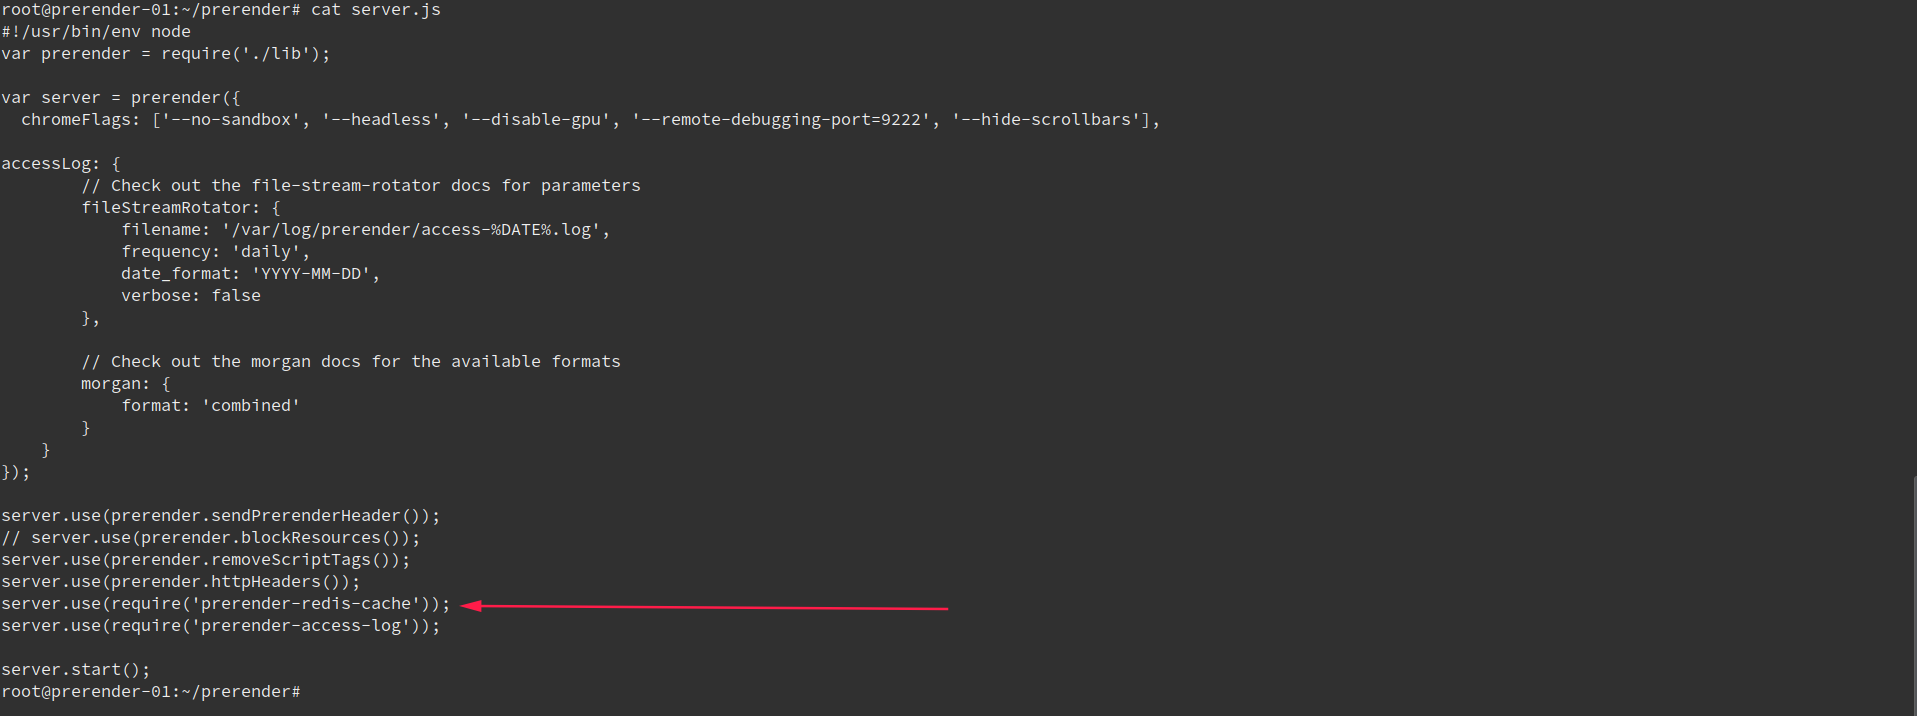
Change the server.js to use the redis cache plugin:
server.use(require('prerender-redis-cache'));
Needs to be added here:
Good to add (optional) is access.log feature and keep the access logs - it can be useful for debugging and other maintenance tasks.
https://github.com/unDemian/prerender-access-log
npm install prerender-access-log --save
Initialize the plugin in the server.js. You also need to configure the access log settings. Here is the finished version of the server.js:
#!/usr/bin/env node
var prerender = require('./lib');

var server = prerender({
  accessLog: {
        // Check out the file-stream-rotator docs for parameters
        fileStreamRotator: {
            filename: '/var/log/prerender/access-%DATE%.log',
            frequency: 'daily',
            date_format: 'YYYY-MM-DD',
            verbose: false
        },

        // Check out the morgan docs for the available formats
        morgan: {
            format: 'combined'
        }
    },
chromeFlags: ['--no-sandbox', '--headless', '--disable-gpu', '--remote-debugging-port=9222', '--hide-scrollbars']
});

server.use(prerender.sendPrerenderHeader());
// server.use(prerender.blockResources());
server.use(prerender.removeScriptTags());
server.use(prerender.httpHeaders());
server.use(require('prerender-memory-cache'));
server.use(require('prerender-redis-cache'));
server.use(require('prerender-access-log'));

server.start();
Best way to see if Redis started adding keys is to use redis-cli tool:
root@prerender-01:~/prerender# redis-cli
127.0.0.1:6379> keys *
1) "https://magentocommand.ml/catalog/category/view/s/jackets/id/323/?climate=8057&color=7903&material=8008"
2) "https://magentocommand.ml/"
3) "https://magentocommand.ml/catalog/category/view/s/bottoms/id/322/?climate=8064&eco_collection=0&erin_recommends=0&material=8003&new=1&pattern=8049&style_bottom=7960"
Now test page a few times and see how it renders super fast!
I hope that you will find this post useful for your JavaScript SEO usage scenarios. As always, please do not hesitate to send me your comments and questions. I will be happy to help. Good luck!