Today I will share how to create a VPN network and how to utilize it cost effectively or even for free. Recently, I've started to look at all of the possible solutions in this area and today I will mention two, which for me are ideal with regards to installation, maintenance, and optimal resource usage.
What is a VPN?
A VPN or Virtual Private Network is a method used to add security and privacy to private and public networks, like WiFi Hotspots and the Internet. VPNs are more commonly used by corporations to protect sensitive data. VPNs can provide functionality, security and/or network management benefits to the user. But they can also lead to new issues, and some VPN services, especially "free" ones, can actually violate their users' privacy by logging their usage and making it available without their consent or make money by selling the user's bandwidth to other users.
Some VPNs allow employees to securely access a corporate intranet while located outside the office. Some can securely connect geographically separated offices of an organisation, creating one cohesive network. Individual Internet users can use some VPNs to secure their wireless transactions, to circumvent geo-restrictions and censorship, and/or to connect to proxy servers for the purpose of protecting personal identities and locations. But some Internet sites block access via known VPNs to prevent the circumvention of their geo-restrictions.
A VPN is created by establishing a virtual point-to-point connection through the use of dedicated connections, virtual tunnelling protocols, or traffic encryption. A VPN available from the public Internet can provide some of the benefits of a wide area network (WAN). From a user perspective, the resources available within the private network can be accessed remotely or kept private.
The first software that I tested was OpenVPN which comes from OpenVPN Technologies, Inc. James Yonan. The initial release was pushed on 13th, May 2001. They have regular updates and it declares itself as an open-source software application, but not all parts are "free". I will write more about that later.
Looking for other VPN solutions I've run into the Softether VPN server application coming from the University of Tsukuba in Japan. Softether has long been a proprietary product under name PacketX and it has been open sourced just several years ago. That may be the reason why it is Windows oriented. The configuration GUI is Windows only and connecting from Linux clients requires extra work, but it also has Linux console which can be combined. Today we are going to cover both.
We are testing this on plain CentOS 7 server, in my case KVM QEMU instance, but can be booted on anything really.
First let's prepare system:
1) yum update
2) yum -y groupinstall "Development Tools"
3)
yum -y install gcc zlib-devel openssl-devel readline-devel ncurses-devel wget tar dnsmasq net-tools iptables-services system-config-firewall-tui nano iptables-services
Disable SELinux:
sed -i 's/SELINUX=enforcing/SELINUX=disabled/g' /etc/selinux/config
Now we can start with server installation:
4) cd /usr/local
5)
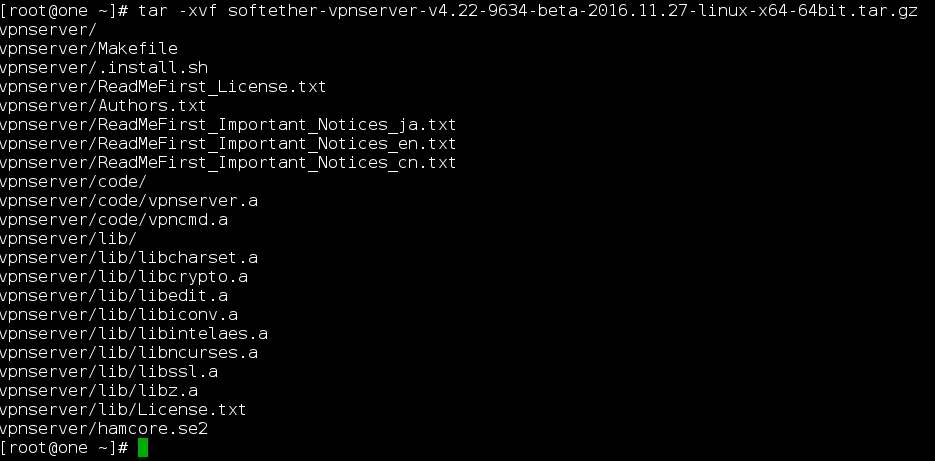
wget -c http://www.softether-download.com/files/softether/v4.22-9634-beta-2016.11.27-tree/Linux/SoftEther_VPN_Server/64bit_-_Intel_x64_or_AMD64/softether-vpnserver-v4.22-9634-beta-2016.11.27-linux-x64-64bit.tar.gz
(you can visit https://www.softether.org/5-download website to check for the latest version)
6) extract archive within /usr/local/ folder:
tar -xvf softether-vpnserver-v4.22-9634-beta-2016.11.27-linux-x64-64bit.tar.gz
7) cd /usr/local/vpnserver ; make
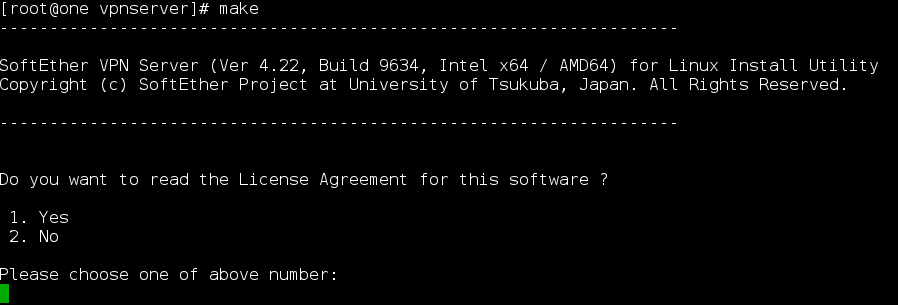
Select 1 and accept License Agreement.
8) The developers of this software were really detailed and descriptive, so they have added everything at end of installation. If you get this at the end of your installation, it means that you have managed successfully to install SoftEther VPN application on your CentOS 7 server.
The preparation of SoftEther VPN Server is completed!
* How to switch the display language of the SoftEther VPN Server Service *
SoftEther VPN Server supports the following languages:
- Japanese
- English
- Simplified Chinese
You can choose your preferred language of SoftEther VPN Server at any time.
To switch the current language, open and edit the 'lang.config' file.
* How to start the SoftEther VPN Server Service *
Please execute './vpnserver start' to run the SoftEther VPN Server Background Service.
And please execute './vpncmd' to run the SoftEther VPN Command-Line Utility to configure SoftEther VPN Server.
Of course, you can use the VPN Server Manager GUI Application for Windows / Mac OS X on the other Windows / Mac OS X computers in order to configure the SoftEther VPN Server remotely.
* For Windows users *
You can download the SoftEther VPN Server Manager for Windows
from the http://www.softether-download.com/ web site.
This manager application helps you to completely and easily manage the VPN server services running in remote hosts.
* For Mac OS X users *
In April 2016 we released the SoftEther VPN Server Manager for Mac OS X.
You can download it from the http://www.softether-download.com/ web site.
VPN Server Manager for Mac OS X works perfectly as same as the traditional Windows versions. It helps you to completely and easily manage the VPN server services running in remote hosts.
make[1]: Leaving directory `/usr/local/vpnserver'
9) Next we need to make the init script for softether application because developers have not included into the install. Run nano /etc/init.d/vpnserver and make paste this script.
wget -c http://www.softether-download.com/files/softether/v4.22-9634-beta-2016.11.27-tree/Linux/SoftEther_VPN_Server/64bit_-_Intel_x64_or_AMD64/softether-vpnserver-v4.22-9634-beta-2016.11.27-linux-x64-64bit.tar.gz
7) Next step we need to make shell script that we just created before with executable rules, so it can be started properly during the boot process and manually.
tar -xvf softether-vpnserver-v4.22-9634-beta-2016.11.27-linux-x64-64bit.tar.gz

Note: Please ignore alert about tapsoft interface. It is added into the vpnserver bash script, and we will configure it later during this tutorial.
In this tutorial we are going to use 10.8.8.0/24 as example range, and that is why TAPADDR=10.8.8.1 as server address. You can use anything you wish.
Moving over to the configuration part, we need to start vpncmd utility (Linux method), later I will add the easier way by installing SE VPN Server Manager Tool. Software is made in that way that everything can be configured from shell and GUI mode leaving to the end-user preferred method.
/usr/local/vpnserver/vpncmd
Press 1 to select "Management of VPN Server or VPN Bridge", and then when asked which server to configure, press enter and it will choose localhost where you just installed Softether application. Press Enter one more time to get access to the server as Administrator.
Next type:
/usr/local/vpnserver/vpncmd
to set the admin password for the server. In order to use softether, virtual hub needs to be created. We will create one named one.nemanja.io with the following command:
localhost
You will be prompted to set the password, which you will use to administer a hub, without access to entire VPN server. Practically one VPN server can have unlimited Hubs connecting multiple customers, and that is why this software is so unique.
Now we need to create a local bridge. That is more efficient way, comparing to other. There is also built-in SecureNAT which is easier to setup, but sadly it is resource intensive. We will go with setting up local bridge and tap device, note that with local bridge also DHCP server needs to be configured and installed which we are going to do bellow. Local bridge is created with the following command:
UserCreate
If TAP device creation fails with the message about insufficient privileges, you might want to check if your network controller is set in promiscuous mode. If you are using some popular Virtualization software like SolusVM/OnApp, make sure that Tun/Tap option is enabled for the VPS. I haven't had problems with Proxmox or with using Xen, so I believe this is enabled by default.
Now we need to create a user for the one.nemanja.io virtual hub that we have previously created. Users are created with command UserCreate and you can view the list of users by command UserList. Users can be added to groups and each group can have different authentication mode/privileges, for example, Password, Certificate, RADIUS, NTLM and etc etc.
Configuring the Virtual Hub
Now we need to switch to hub one.nemanja.io
Hub one.nemanja.io
and create user
UserCreate test
We will keep it simple and use password auth, so use the following command
UserList
Now we need to setup L2TP/IPSec:
VPN Server/one.nemanja.io> IPsecEnable
IPsecEnable command - Enable or Disable IPsec VPN Server Function
Enable L2TP over IPsec Server Function (yes / no): yes
Enable Raw L2TP Server Function (yes / no): yes
Enable EtherIP / L2TPv3 over IPsec Server Function (yes / no): yes
Pre Shared Key for IPsec (Recommended: 9 letters at maximum): secret
Default Virtual HUB in a case of omitting the HUB on the Username: one.nemanja.io
The command completed successfully.
That is it for the IPsec part, but we also want to have other protocols. For example OpenVPN and Microsoft protocols. Now we must use ServerCertRegenerate command to generate and register an SSL certificate for the server in order to be able to use it for the OpenVPN and Microsoft clients. The argument passed to the command must be your server IP address or FQDIN:
ServerCertRegenerate <YOUR SERVER IP or FQDN>
When new server certificate has been created, we need to save it to the file:
ServerCertGet ~/cert.cer
This certificate now can be distributed to your clients. We can now enable SSTP function with this command:
SstpEnable yes
And to enable OpenVPN:
OpenVpnEnable yes /PORTS:1194
Port for OpenVPN can be changed to your liking, but let's say that 1194 is standard. Then we need to create config for OpenVPN client like this
OpenVpnMakeConfig ~/openvpn_config.zip
VPN over DNS and VPN over ICMP
Type Hub to return to administering entire VPN server and not just MOB hub.
VPN Server/one.nemanja.io>Hub
Hub command - Select Virtual Hub to Manage
The Virtual Hub selection has been unselected.
The command completed successfully.
For maximal evasion of all blockages, we also need to enable VPN over ICMP and DNS:
VpnOverIcmpDnsEnable /ICMP:yes /DNS:yes
VpnOverIcmpDnsEnable command - Enable / Disable the VPN over ICMP / VPN over DNS Server Function
The command completed successfully.
Exit the vpncmd because we need to stop the vpnserver and setup dnsmasq. Dnsmasq is a Domain Name System (DNS) forwarder and Dynamic Host Configuration Protocol (DHCP) server for small computer networks, created as free software. Dnsmasq has low requirements for system resources, can run on Linux, BSDs, Android and OS X, and is included in most Linux distributions.
OR
We can use native CentOS 7 DHCP service and configure it. In case you don't have dhcp service installed, you can simply install it with:
yum install dhcp
Then:
systemctl enable dhcpd &&
systemctl start dhcpd
Now we need to configure it:
#
# DHCP Server Configuration file.
#   see /usr/share/doc/dhcp*/dhcpd.conf.example
#   see dhcpd.conf(5) man page
#
option rfc3442-classless-static-routes code 121 = array of integer 8;
option ms-classless-static-routes code 249 = array of integer 8;

#host test  { hardware ethernet CA-80-D7; fixed-address 10.8.8.50; } # test line
authoritative;

subnet 10.8.8.0 netmask 255.255.255.0 {

        range 10.8.8.10 10.8.8.250;
        option subnet-mask 255.255.255.0;
        option broadcast-address 10.8.0.255;
        option rfc3442-classless-static-routes 24, 10, 8, 8, 10, 8, 8, 1;
        option ms-classless-static-routes 24, 10, 7, 7, 10, 7, 7, 1;

}
Short about info about this:
1) range <-- Available IP address allocation for clients.
2) option subnet-mask <-- default is 255.255.255.0, you can use anything which fits your network.
3-4) option rfc3442-classless-static-routes and ms routes. The rfc3442-classless-static-routes option allows you to use classless network addresses http://en.wikipedia.org/wiki/ClasslessInter-DomainRouting (or CIDR) instead.
CIDR requires a subnet mask to be explicitly stated, but the original DHCP option 33 doesn't have space for this. Therefore, this option (as defined in RFC 3442) simply enables a newer replacement DHCP option (option 121) which defines static routes using CIDR notation.
Basically, if you need to issue static routes to your devices using DHCP and these static routes use CIDR then you need to enable this option.
A static route can be used if you have split a network into to multiple smaller networks and need to inform each router about how traffic gets from one to another without using one of the many dynamic routing protocols available. You basically set up each router with a statement to the effect of "to get to network a.b.c.d, send traffic through f.g.h.i".
If the route you set up in the router is classful, then you do not need to enable this option. However, if the routes are CIDR then you will need to enable this option. Fortunately, many home/cafe network use the 192.168.0.0 network with a subnet of 255.255.255.0 (or /24), which is a true Class-C network, therefore you can avoid this option.
On the other hand, some home/cafe networks run on the 10.0.0.0 network. This is a Class-A network by default. If you are breaking this into many 10.0.x.0 subnets for example, then these will all be CIDR networks which mean you will need to enable this option.
Here is a really useful article on pushing routes via dhcp service:
http://thomasjaehnel.com/blog/2010/01/pushing-routes-via-dhcp.html
Now let's continue further, and get back to the DNSMasq method:
service vpnserver stop
DHCP server, forwarding and postrouting using DNSMasq
We need to edit /etc/dnsmasq.conf or use echo command to append needed lines to it. We will use latter option and while we are at it, we will also echo the ipv4_forwarding.conf
echo interface=tap_soft >> /etc/dnsmasq.conf
echo dhcp-range=tap_soft,192.168.7.50,192.168.7.90,12h >> /etc/dnsmasq.conf
echo dhcp-option=tap_soft,3,192.168.7.1 >> /etc/dnsmasq.conf
echo port=0 >> /etc/dnsmasq.conf
echo dhcp-option=option:dns-server,8.8.8.8 >> /etc/dnsmasq.conf

echo net.ipv4.ip_forward = 1 >> /etc/sysctl.d/ipv4_forwarding.conf
Apply settings by running following:
sysctl -n -e --system
Check if it is applied:
cat /proc/sys/net/ipv4/ip_forward
It should show 1. If it shows 0, do this
echo 1 > /proc/sys/net/ipv4/ip_forward
Enable nat and postrouting:
iptables -t nat -A POSTROUTING -s 10.8.8.0/24 -j SNAT --to-source [YOUR SERVER IP ADDRESS]

iptables-save > /etc/sysconfig/iptables
Restart vpn and dhcp servers with the folowing commands and enable them to start at every boot:
service vpnserver start

systemctl start dnsmasq

systemctl enable dnsmasq

chkconfig vpnserver on
Now you can safely reboot your fresh VPN server and enjoy running it. If controlling your VPN server from the command line is too difficult, guys from Softether gone beyond and made beautiful software for Windows and MacOS. You can get the Softether VPN Manager software from the following address:
http://www.softether-download.com/en.aspx?product=softether
When you install software and load it, please click on "NEW SETTING" button. Next, fill up fields as shown bellow:
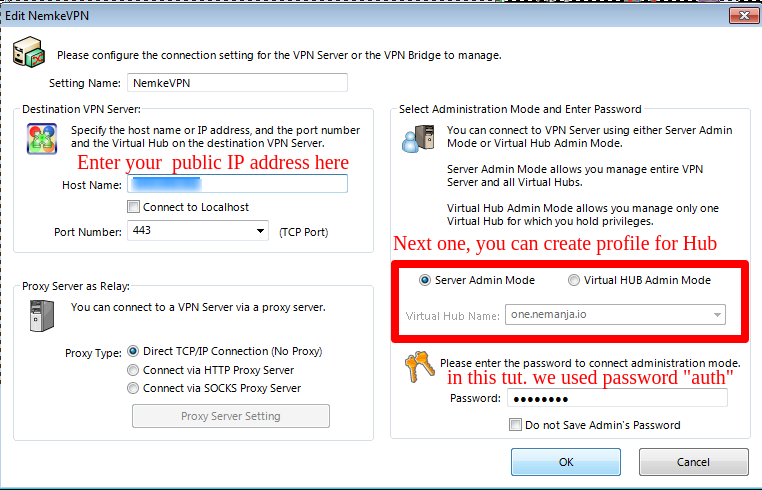
After clicking on OK, a screen is going to look like this:
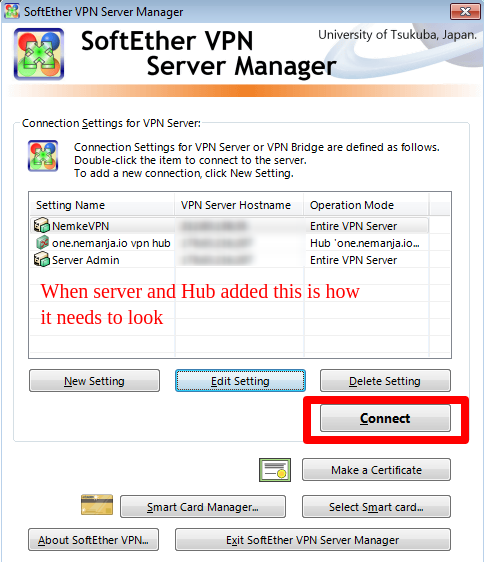
From the next menu, you are able to control every aspect of your VPN server, as you do from the command line.
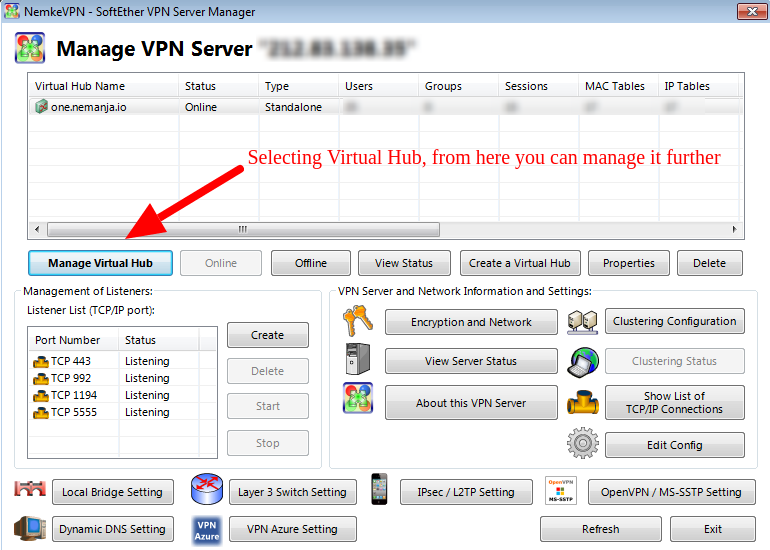
I am going to describe closely each function on that screen:
1) Manage Virtual Hub --> From there you can control each Hub.. add/remove/adjust users and etc.
2) Online --> Power on Hub.
3) Offline --> Shutdown Virtual Hub.
4) View Status --> You can view status of Virtual Hub, like how many users are online, how many data is used (incoming and outgoing) and many other useful pieces of information.
5) Create a Virtual Hub --> Boot up the new hub and configure the profile.
6) Properties --> Change Hub properties (password, welcome text and other advanced options).
7) Delete --> Remove Virtual Hub and all its settings.
8) Management of listeners is probably going to be listed with 443,992,1194 and 5555 TCP ports. Here you can create the additional listening port if needed.
9) Local Bridge Setting is reserved for the local bridge adapter which we have configured previously (tapsoft) which in our tutorial is listening on 10.8.8.1 IP address. You can from this menu create the additional bridge or redefine on how it is configured.
10) Dynamic DNS settings is an amazing feature from SoftEther guys, which assigns a unique and permanent DNS hostname for this VPN server, for example:
blablabla.softether.net
11) Layer 3 Switch setting --> You can define Virtual Layer 3 switches between two or more virtual hubs operating on this VPN server to achieve routing between different IP Networks.
12) VPN Azure settings --> NAT Traversal works with most of NATs and Firewalls, however, some restricted firewalls cannot pass NAT Traversal packets. In such a case do not give up. You can activate VPN Azure Relay Service on SoftEther VPN. After that, all VPN connecting requests from VPN Client or VPN Bridge will be relayed through the VPN Azure Cloud Servers operated by SoftEther VPN Project for free of charge. VPN Azure is the ultimate methods to penetrate any kinds of firewalls.
The principle of VPN Azure is very simple. SoftEther VPN Server behind the firewall always keep a TCP-based connection toward a VPN Azure relay server. It is permitted automatically by the firewall because the direction of the initial connection is "from inside to outside". The firewall treats such packets as trusted. VPN Client or VPN Bridge requests the appropriate VPN Azure relay server to connect to the VPN Server. The VPN Azure relay server will relay the connection request to the SoftEther VPN Server. Then SoftEther VPN Server will establish the UDP-based VPN tunnel between the VPN Server and the VPN Client (or VPN Bridge). After the UDP-based link has been established the VPN relay server doesn't relay the payloads of VPN tunnel. More information here: https://www.softether.org/4-docs/2-howto/6.VPNServerBehindNATorFirewall/2.VPNAzure
13) IPSec/L2TP --> The IPsec VPN Server Function is disabled by default. Here is a useful doc page on how to configure IPSec/L2TP function properly:
https://www.softether.org/4-docs/2-howto/9.L2TPIPsecSetupGuideforSoftEtherVPNServer/1.SetupL2TP%2F%2F%2F%2FIPsecVPNServeronSoftEtherVPNServer
14) OpenVPN --> Are you still using OpenVPN? SoftEther VPN has more ability, better performance and easy-configurable GUI-based management tools. SoftEther VPN has also the OpenVPN Server Clone Function so that any OpenVPN clients, including iPhone and Android, can connect to SoftEther VPN easily. Here is a useful documentation page on how to configure OpenVPN service properly:
https://www.softether.org/4-docs/2-howto/7.ReplacementsofLegacyVPNs/2.Replacementsof_OpenVPN
More useful informaton and tutorials you can find on their amazing documentation page here:
https://www.softether.org/4-docs/2-howto
Conclusion
That concludes installation and configuration of Softether VPN server. It is configured with Local Bridge for maximum performance, and now we only need to connect clients using different protocols. The Windows and Android ones are easy, for Windows you just head to the Softether site and download GUI client and connect (http://www.softether-download.com/en.aspx?product=softether). For Android, you don't need even that, you have VPN client built in, or you can download OpenVPN client from Google App store and configure it properly. On Linux OS (server) you can configure OpenVPN or any other known L2TP metho. Overall, from my tests so far, Softether has shown as decent free VPN solution software who by my personal opinion in several aspects is a way better solution than OpenVPN.
If anyone needs help with installation and configuration of this software feel free to ping me at any time.
Nemanja